
Receiving a new air fryer sample is exciting, but approving one that looks good on the outside can lead to disaster. When we develop new models, we know that external appearance often hides critical internal flaws, risking costly returns and damaging your brand’s reputation.
To properly judge an air fryer sample, you must perform a series of "torture tests." Go beyond a simple visual check by evaluating safety, cooking performance, build quality, and coating durability. This hands-on approach reveals the true quality of the internal components and assembly.
This is the only way to distinguish a reliable unit from a potential liability. Let’s walk through the exact testing protocol we use to validate our own products before they ever reach the production line.
What Criteria Should I Use to Evaluate Air Fryer Samples?
You’ve got the sample, but a quick glance isn’t enough. Approving a unit based on aesthetics alone is a common mistake that can lead to approving a fundamentally flawed product. We always advise our partners to use a structured evaluation checklist that prioritizes what truly matters.
You should evaluate an air fryer sample based on four critical criteria: Safety (absence of chemical smells), Performance (even cooking, temperature accuracy), Build Quality (tight seams, insulated handle), and Component Durability (especially the non-stick coating). These factors directly impact user experience and product longevity.
To effectively evaluate a sample, you need a systematic approach. The most beautiful air fryer is useless if it smells of burning plastic or fails after a few months. On our own assembly lines, quality control starts with validating these core attributes in the initial samples. The goal is to identify potential deal-breakers early. A sample isn’t just a product; it’s a reflection of the supplier’s engineering standards and material choices.
Critical Safety and Smell Test
The number one complaint from end-users about imported air fryers is a persistent "burning plastic" smell. This is an immediate red flag.
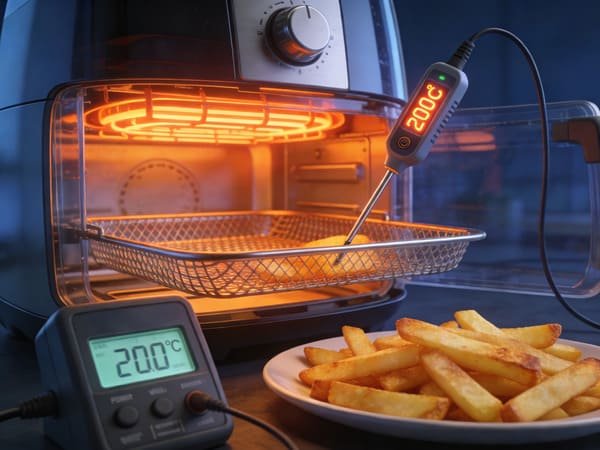
- The Test: Run the empty air fryer at its maximum temperature (usually 200°C / 400°F) for at least 20 minutes in a well-ventilated room.
- What to Expect: A slight "new appliance" odor during the first 5-10 minutes is normal and should dissipate.
- Fail Criteria: If the room fills with a strong, acrid chemical smell that stings your eyes, or if the smell persists after a second and third cycle, you must reject the sample. This indicates the manufacturer used low-grade plastics or adhesives near the heating element that cannot withstand high temperatures.
Performance and Build Quality
Here, you assess how well the unit cooks and how well it’s put together.
- Cooking Uniformity: The true test of an air fryer’s airflow design is its ability to cook evenly. Burnt tops and soggy bottoms indicate poor engineering.
- Assembly and Gaps: Look closely at the seams where plastic parts meet. Gaps should be uniform and minimal (ideally under 0.5mm). Large or uneven gaps suggest poor quality molds or sloppy assembly.
- Handle Insulation: After running the machine, the handle must remain cool to the touch. A warm or hot handle is a safety hazard caused by insufficient insulation.
| Evaluation Category | Key Checkpoints | Pass / Fail Indicator |
|---|---|---|
| Safety | Persistent plastic/chemical smell after 20 mins at max temp. | Fail if smell is strong and does not dissipate. |
| Performance | Fries are cooked unevenly (some burnt, some soggy). | Fail if cooking is not uniform after shaking. |
| Build Quality | Gaps between plastic parts are >0.5mm and uneven. | Fail if gaps are large or inconsistent. |
| Durability | Handle becomes warm or hot during operation. | Fail if handle is not cool to the touch. |
How Can I Conduct Effective Sample Testing and Feedback?
Finding flaws in a sample is one thing, but testing them methodically is another. Randomly trying features won’t give you the concrete data needed for effective feedback. To avoid miscommunication with your supplier, we always follow a strict, repeatable testing protocol for clear, actionable results.
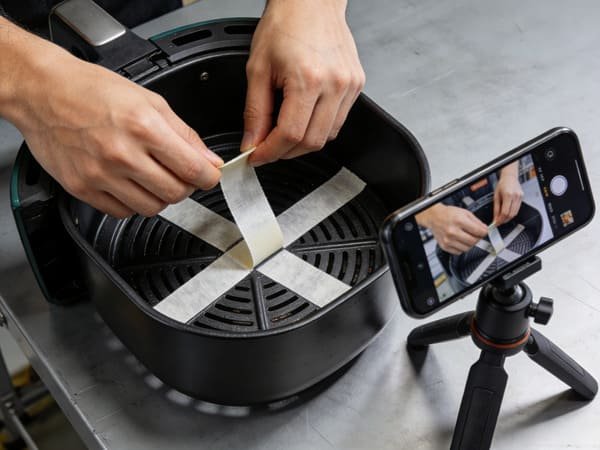
To conduct effective testing, use standardized benchmarks. Cook frozen french fries to test evenness, use an oven thermometer to verify temperature accuracy, and perform a tape-adhesion test on the coating. Document every step with photos, videos, and specific measurements for unambiguous feedback.
Effective testing is about creating undeniable proof. When we send feedback to a component supplier, we don’t just say "the coating is bad." We provide a video of the tape test showing the coating peeling off, along with close-up photos. This data-driven approach removes ambiguity and forces the supplier to address the specific issue rather than offer vague assurances. Treat your sample testing like a scientific experiment: control the variables, measure the outcomes, and document everything.
Non-Stick Coating Durability Tests
The basket’s non-stick coating1 is a major point of failure. A cheap coating will lead to customer complaints and returns within months.
- The "Tape" Test: This is a classic adhesion test. Use a sharp utility knife to gently score a crosshatch (#) pattern on a small, hidden area of the coating. Press a piece of strong adhesive tape (like 3M packing tape) firmly over the grid, then rip it off quickly. If any squares of coating come off with the tape, the adhesion is poor and the coating will peel.
- The "Scratch" Test: Use the edge of a coin to lightly scrape the coating. A quality multi-layer Teflon or ceramic coating will resist minor scratches. A cheap, single-layer spray-on coating will flake or scratch off immediately.
Performance Verification
Here you check if the air fryer performs as advertised.
- Temperature Accuracy: Don’t trust the digital display. Place an oven thermometer inside the basket and set the air fryer to 200°C (400°F). Let it run for 10 minutes. The thermometer’s reading should be within ±10°C (±18°F) of the set temperature. Wild fluctuations indicate a cheap thermostat, which causes food to burn on the outside while remaining raw inside.
- Wattage Draw: Use a simple plug-in power meter (like a Kill-A-Watt) to measure the actual power consumption. It’s common for suppliers to overstate wattage. If a unit is advertised as 1700W but only draws 1500W, it will heat up slower and cook less effectively.
| Test Method | Procedure | Expected Result (Pass) |
|---|---|---|
| Tape Adhesion Test | Score a grid, apply strong tape, and rip it off. | No coating flakes should be on the tape. |
| Temperature Accuracy | Place an oven thermometer inside, set to 200°C. | Reading should stabilize between 190°C and 210°C. |
| Wattage Draw Test | Use a power meter to measure consumption at max power. | Measured wattage is within 5-10% of the advertised spec. |
What Questions Should I Ask Suppliers During the Sample Review Process?
You have your test results, but what’s next? Asking a supplier vague questions like "Can you improve the quality?" is ineffective. In our experience, this approach leads to non-committal answers. To get real changes, you need to ask targeted questions that demand specific, technical answers.
Ask specific questions about materials and processes. Instead of "Fix the smell," ask "What grade of plastic (e.g., PP, PBT) are you using for the inner housing, and what is its heat rating?" This forces the supplier to address the root cause, not just the symptom.

When we encounter an issue with a sample, our engineers get on a call and ask pointed questions. For a peeling coating, we ask: "What brand of coating are you using? How many layers are applied? What is the curing temperature and duration?" This level of detail shows the supplier you are knowledgeable and serious about quality. It shifts the conversation from a negotiation to a technical problem-solving session, which is far more productive. Your goal is to get concrete commitments for changes in materials or processes for the next sample and mass production.
Questions about Materials and Components
- Plastic Smell: "What specific material is causing the smell? Can you provide the material safety data sheet (MSDS)2 for the plastics and adhesives used near the heating element? What alternative, higher-temperature-rated material will you use in the next sample?"
- Coating: "What is the brand and model number of the non-stick coating? Is it PFOA-free3? How many layers are applied? Can you increase the coating thickness and provide a report?"
- Thermostat: "The temperature fluctuates by 25°C. What brand of thermostat are you using? Can you switch to a more stable NTC thermistor and recalibrate the controller for the next sample?"
Questions about Process and Quality Control
- Assembly Gaps: "The gaps in the housing are uneven. Is this due to the mold or the assembly process? What steps will your QC team take on the production line to ensure housing alignment is within a 0.5mm tolerance?"
- Power Discrepancy: "The sample is rated at 1700W but only draws 1550W. Is this an issue with the heating element specification or the power supply? Please ensure the mass production units meet the 1700W (±5%) specification."
- Cord Length: "The specification sheet stated a 1.0m cord, but the sample’s cord is only 0.8m. Please confirm all production units will have a 1.0m cord."
How Do I Document and Communicate My Sample Assessment Results?
After thorough testing, your findings are useless if they aren’t communicated clearly. A simple email saying "the sample failed" will only cause delays and confusion. When we reject a sample or request modifications, we provide a comprehensive report that leaves no room for interpretation.
Create a detailed Sample Evaluation Report. Use a structured format with clear headings for each test. Include photos, short video clips, and specific measurements. List each issue as a "non-conformance" and classify it by severity (e.g., Critical, Major, Minor).
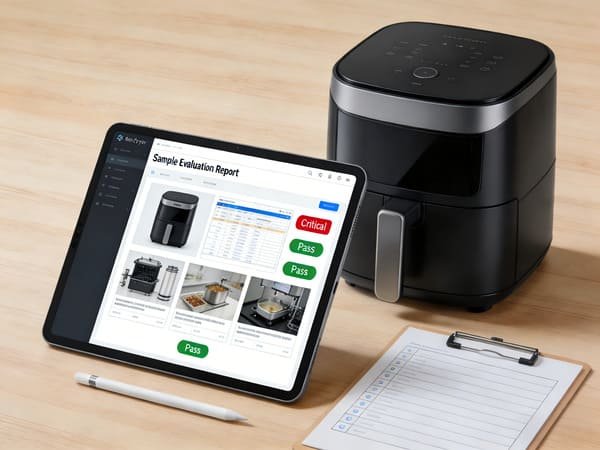
Think of this report as the official record of your assessment. It becomes the basis for all future discussions and serves as a reference point for the "Golden Sample" you will eventually approve. A professional, well-documented report signals to the supplier that you are a serious partner with high standards. This process not only ensures the supplier understands the required changes but also builds a foundation of clear communication for the entire project. It protects you by creating a paper trail of agreed-upon fixes.
Creating the Sample Evaluation Report
Your report should be structured, concise, and visual.
- Header: Include the date, product name/model, sample version (e.g., V1), and your company name.
- Overall Verdict4: Start with a clear summary: "Approved," "Approved with Modifications," or "Rejected."
- Non-Conformance List5: This is the core of the report. Use a table to list each issue.
Example Non-Conformance Table
| ID | Test Category | Issue Description | Evidence | Severity | Required Action |
|---|---|---|---|---|---|
| 01 | Safety | Strong chemical smell after 20 mins at 200°C. | Video_Smell_Test.mp4 | Critical | Identify and replace low-grade plastic/glue. Provide material spec sheet for new parts. |
| 02 | Coating | Coating peeled off during 3M tape test on basket interior. | Photo_Tape_Test.jpg | Critical | Upgrade to a proven brand (e.g., Whitford, Pfluon), apply 2 layers, and provide adhesion test report. |
| 03 | Performance | Set temp 200°C, actual temp fluctuated between 180°C and 215°C. | Photo_Thermometer.jpg | Major | Replace thermostat with a more stable model and recalibrate firmware. |
| 04 | Build Quality | Power cord length is 0.82m, spec sheet requires 1.0m. | Photo_Cord_Measure.jpg | Minor | Confirm all production units will have a 1.0m power cord as per specification. |
Finally, send this report via email and schedule a follow-up call or WhatsApp chat to walk through the findings, ensuring the supplier’s engineering team understands every point.
Conclusion
Thoroughly testing an air fryer sample is non-negotiable. By following a structured process, you can confidently identify critical flaws, communicate effectively, and ensure the final product meets your quality standards.
-
Explore this link to understand various tests that ensure the longevity and effectiveness of non-stick coatings. ↩
-
Understanding MSDS is crucial for safety and compliance in handling materials, especially in manufacturing. ↩
-
Exploring the implications of PFOA-free coatings can help you make safer choices in kitchenware. ↩
-
Learning how to determine an Overall Verdict can enhance your evaluation process and improve product quality. ↩
-
Understanding a Non-Conformance List is crucial for identifying and addressing product issues effectively. ↩